Part 7 · Setup, Customization & Hardware
Live data & hardware setup (reference)
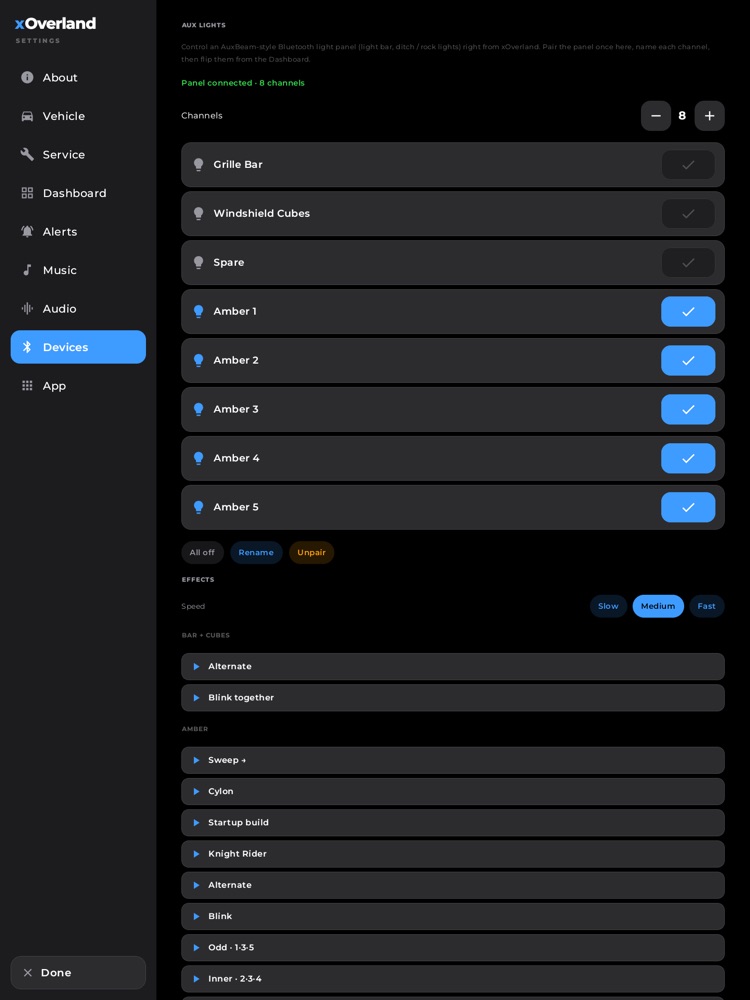
Settings > Devices: pair Bluetooth accessories like the aux-light panel. (Your OBD-II adapter pairs in the head unit's own Bluetooth settings, and the app finds it by name.)
Everything xOverland shows about your truck — speed, fuel, coolant, tire pressures, gear, tilt, your position on the map — comes from a real source. This page is the plain-English map of where each number comes from and how to connect the piece that unlocks it. xOverland is built to degrade gracefully: anything not yet connected simply shows a dash ("—"), a preview, or an honest "not connected" card instead of faking a value.
Where to find it: Header › gear icon › Settings. Device pairing lives under Devices; keys and permissions under App; live-signal readouts under Dashboard.
When you'll use it: Once, when you first set the truck up — and again any time you add a new adapter, get a new phone, or want to confirm what's live right now.
The sources, at a glance
xOverland pulls from several places at the same time and blends them so you always get the best available number:
- OBD-II adapter (Bluetooth) — the engine and body signals: coolant, fuel, battery voltage, engine load, and (on a capable adapter) gear, drivetrain, tire pressures, oil life and the true odometer.
- The head unit's CAN connection — factory climate control and, on some trucks, cluster signals pushed straight from the vehicle.
- The head unit's own GPS and motion sensors — your position, heading and speed on the map, plus the tilt/grade inclinometer.
- The Carlinkit dongle (USB) — wired CarPlay and Android Auto on the XLink page.
- A Bluetooth aux-light controller — your light bar, cubes and ditch/rock lights.
- GPX files you import — trails and waypoints shared from Gaia, onX, Garmin or CalTopo.
You can always see exactly what's flowing at any moment: open Settings › Dashboard and scroll to Available signals, which lists every live value grouped by source (OBD-II, CANbus, Device & GPS). Empty groups fill in as each source comes online.
The OBD-II adapter — engine, fuel, and the deep truck data
A small Bluetooth OBD-II adapter that plugs into the diagnostic port under your dash is what turns the dashboard from a pretty layout into a live instrument cluster. The owner's truck uses an OBDLink MX+; any quality ELM327-style adapter works, and an OBDLink (STN chip) unlocks the most.
What it unlocks:
- Engine & fluids — coolant temperature, engine load, throttle, intake and ambient air temperature, and control-module (battery) voltage.
- Fuel — fuel level and, combined with your driving, live and average MPG and range.
- Trouble codes — check-engine (MIL) status, plus the ability to scan and clear stored codes from the About/diagnostics view.
- The GM body signals no OBD app usually reads (OBDLink / STN adapter only) — gear (P/R/N/D), drivetrain (2WD / 4 High / 4 Low), parking brake, turn signals, per-corner tire pressures, transmission-fluid temperature, oil life %, and the real odometer. These feed the cluster, the Tow/Haul page, the maintenance reminders and the XDirt off-road cockpit.
How to connect it:
- Plug the adapter into the OBD-II port (under the dash, driver's side).
- Open your head unit's Android Bluetooth settings and pair the adapter there once, like any Bluetooth device. (xOverland uses the system pairing — there is no separate OBD pairing screen inside the app.)
- Back in xOverland, the adapter is found automatically by name. Open Settings › Dashboard › Available signals and watch the OBD-II and CANbus groups fill in.
What you'll see before it's connected: engine and fuel cards show a dash instead of a number, and the status detail reads "Pair an OBD-II adapter in Bluetooth settings." Nothing is faked. Speed and RPM can still come from the head unit's own CAN connection even without the adapter.
Good to know: an OBDLink adapter periodically and automatically "dips" over to the GM single-wire body bus to read gear, drivetrain and tire pressures, then returns — you don't do anything. Some of those signals (especially tire pressures and grade) only appear once you've been driving above ~20 mph for a few minutes, because the wheel sensors are asleep when parked. There's a guided CAN Data Capture helper in Settings › App that walks you through a short drive to wake everything up.
The head-unit CAN connection — factory climate & cluster
When xOverland is installed on the aftermarket head unit and that unit is wired into the truck's data bus, xOverland can talk to the factory systems directly — no dealer tool, no rooting.
What it unlocks:
- Factory climate control — the Climate page reads and sets your real OEM heating and A/C over CAN.
- Speed and RPM — pushed live from the vehicle, so the tach and speedo move even without the OBD adapter.
- Cluster tell-tales on supported trucks — gear, turn signals, headlight/fog/brake lamps, seatbelt and handbrake status, fuel and range, and tire pressures, pushed straight from the instrument cluster.
How to connect it: this is part of the head unit's physical installation — no in-app setup. When the connection is live, xOverland binds to it automatically at startup.
What you'll see before it's connected: the Climate and Audio pages show a read-only preview and note that they'll control the truck once connected. Cluster-only metrics (gear, lamps, cluster TPMS) stay hidden from the dashboard card picker while the cluster is silent, so you can never assign a card to a permanently-empty value — they appear the moment real cluster data arrives.
Good to know: cluster signals can vary by truck and trim. If your truck's cluster doesn't broadcast a particular value, xOverland simply reads it from the OBD adapter's body-bus dips instead — you end up with the same numbers either way.
GPS & motion — from the head unit itself
Your position on both maps, your heading, your on-screen speed, and the tilt/grade inclinometer all come from sensors built into the head unit. No external hardware needed.
What it unlocks:
- Live position, heading and speed on XRoad and XDirt, drawn as a moving 3D truck marker.
- Pitch & roll (grade / side-lean) on the Dashboard and the XDirt off-road HUD, including spoken tilt warnings on steep terrain.
How to enable it: grant location permission when xOverland asks (or in the unit's system app settings). Position seeds from the last known fix immediately, then sharpens as satellites lock in. Accuracy automatically steps up while you're navigating or recording a trail.
Good to know: heading comes from your direction of travel (course over ground), which is far more reliable inside a steel truck cab than a compass. The inclinometer removes your dash-mount angle when you tap Level on flat ground — do this once so "0°" really means level. If the unit has no motion sensor, tilt simply stays at 0° rather than inventing movement.
The Carlinkit dongle — CarPlay & Android Auto
The XLink page runs wired Apple CarPlay and Android Auto through a Carlinkit CPC200-CCPA adapter plugged into the head unit's USB port.
What it unlocks: full-screen CarPlay or Android Auto inside xOverland, plus CarPlay now-playing info in the dock and Music page.
How to connect it:
- Plug the Carlinkit adapter into the head unit's USB port. It's detected automatically — there's no pairing step for the adapter itself.
- Open the XLink page and connect your phone (USB cable, or wireless if your adapter supports it).
What you'll see before it's connected: an honest status card — "No adapter detected — Plug the Carlinkit into the head unit's USB port" when the dongle is missing, and "Connect your phone" once the adapter is ready. xOverland never shows a fake CarPlay mockup; the page always reports exactly what the adapter is doing.
Good to know: climate, cameras and phone projection are ultimately handled by the head unit's own system underneath — xOverland adds the beautiful front end and the deep truck data, and hands projection to the adapter.
The BLE aux-light controller — light bar, cubes & ditch lights
If you have an AuxBeam-style Bluetooth switch panel wired to your auxiliary lights, xOverland can drive it directly, so you flip your light bar, cubes and amber driving lights from the Dashboard and run animated effects.
What it unlocks: on/off control of each light channel, grouped dashboard buttons (Grille Bar, Cubes, Amber Driving), an RGB color/brightness panel where fitted, and looping light effects (sweep, cylon/Knight Rider, blink, and more) with a speed control.
How to connect it: open Settings › Devices:
- Tap Find light panel. (Grant Bluetooth permission if asked, and make sure any vendor light app is closed — the panel allows only one connection at a time.)
- Tap your panel in the list to pair it.
- Set the number of channels, then tap Rename to name each one (e.g. "Light Bar", "Ditch L", "Rock R").
Once paired, the light controls appear on the Dashboard and reconnect automatically every time you start the truck.
What you'll see before it's set up: the Devices page prompts you to scan and pair; if the unit has no Bluetooth adapter at all, it tells you plainly. The Dashboard light row only appears once a panel is paired.
Good to know: your amber driving lights auto-arm the moment the panel connects, so they behave like a factory light. Effects run only while the panel is actually connected, and turning an effect off restores the lights to exactly how they were before.
GPX import — shared trails & waypoints
Bring in a trail or a set of waypoints someone shared from Gaia GPS, onX, Garmin or CalTopo as a standard .gpx file.
What it unlocks: the shared track is saved into your trail library (ready to follow or backtrack), and any waypoints in the file drop as pins on the map.
How to import:
- On the XDirt off-road page, open the Trails library.
- Tap Import GPX.
- Pick the
.gpxfile from your storage. You'll get a confirmation of what was imported, and it appears in your trail list.
How to share back out: any recorded or planned trail can be exported back to .gpx with the share icon, so you can send it to friends or back up to your favorite app.
Good to know: the importer is forgiving — it reads files from all the major apps, handles different text encodings, and salvages whatever it can even from a slightly malformed file. It also guards the head unit against an accidentally-huge file. If a file has neither a track nor waypoints, you'll simply be told nothing was found.
API keys & extras (optional)
A few polish features use free, personal keys you paste into Settings › App. Each is stored only on your device:
- Scout API key (Groq / Gemini / Claude) — powers Scout on the map's sparkle button (voice route planning that weighs your fuel, range, weather and time of day).
- EIA key (free from eia.gov/opendata) — shows regional and US average gas prices on the map's fuel card.
- Apple Music developer token — enables streaming your Apple Music library in the Apple Music tab.
None of these are required for the truck data itself — they're additive. Recall lookups (NHTSA) and the off-road overlays use free, keyless data and just need an internet connection.
Tips & good to know
- Nothing is faked. Any value without a live source shows "—". The Available signals footer in Settings › Dashboard is your live truth check for what's flowing right now.
- Sources blend automatically. If both the head-unit CAN and the OBD adapter can report speed, xOverland prefers the vehicle's own number and fills the rest from the adapter — you never have to choose.
- Some data only appears while moving. Tire pressures, grade and a few body signals need a short drive above ~20 mph to wake up. Use the CAN Data Capture helper (Settings › App) if a value seems stuck at "—" right after connecting.
- Maintenance and Tow/Haul ride on the real odometer. Because service reminders and the trans-temp warning read the truck's actual mileage and fluid temps off the bus, they keep themselves current with zero manual entry once the OBD adapter is connected.