Part 2 · Driving & Navigation
Customizing your dashboard gauges
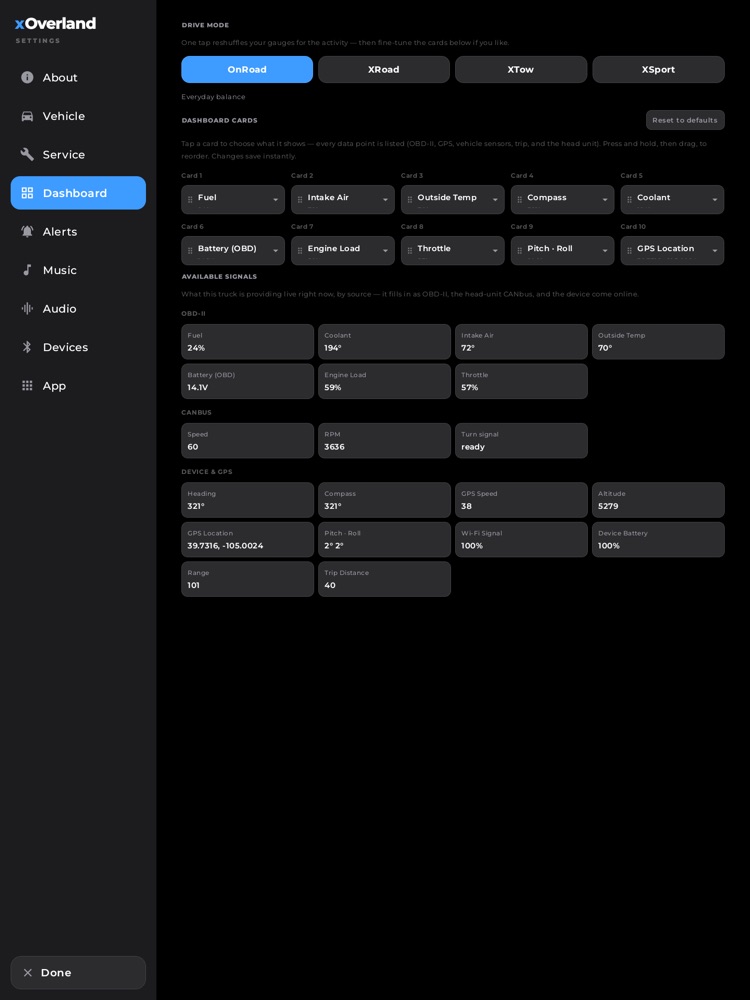
Settings > Dashboard: drive-mode presets, the 10 customizable cards, and the live-signal readout.
Your home dashboard has ten status cards that ring your speed and compass gauges. This is where you decide what each one shows — pick from every reading your truck is currently producing, drag them into the order you like, and switch the whole layout with a single tap when the job changes.
Where to find it: Header (top-right) › gear icon › Dashboard tab
When you'll use it: Set it up once to match how you drive, then reshuffle on the fly — a balanced everyday view for the commute, temperatures and load front-and-center before you hitch up a trailer, or tilt, altitude and heading when you leave the pavement.
The screen, part by part
The Dashboard tab is laid out top to bottom in three sections.
Drive mode (the four buttons at the top)
A row of four big buttons — OnRoad, XRoad, XTow, XSport. Tapping one instantly rearranges all ten cards into a preset tuned for that activity. The active mode is highlighted, and a one-line description sits just beneath the row telling you what that preset emphasizes:
- OnRoad — "Everyday balance." Speed, RPM, fuel, coolant, range, battery, average MPG, outside temp, compass and altitude.
- XRoad — "Off-road: tilt, altitude, heading." Leads with pitch/roll, altitude, compass and heading, then fuel, coolant, battery, range, speed and your GPS location.
- XTow — "Hauling: temps, load, range." Coolant, battery, engine load and fuel up top, plus range, speed, RPM, average MPG, outside temp and altitude.
- XSport — "Performance: revs, load, throttle." Speed, RPM, engine load, throttle and coolant, with battery, GPS speed, average MPG, outside temp and fuel.
A drive mode is just a starting point — after you tap one you're free to fine-tune individual cards, and your tweaks stick.
Dashboard cards (the 2 × 5 grid)
The ten cards themselves, laid out two rows of five, in the exact order they appear on your home screen. Each card shows:
- "Card 1"… "Card 10" — its position, so you always know which slot you're editing.
- A drag-handle icon (the dotted grip) on the left.
- The reading's name (e.g. "Coolant," "Compass," "Pitch · Roll") and, just below it, a small live preview of that reading's current value.
- A small drop-down arrow on the right, hinting that a tap opens the chooser.
Right of the "Dashboard cards" heading you'll find the Reset to defaults button (see below). A short line of instructions reminds you: tap a card to change it, press-and-hold then drag to reorder.
Available signals (the live readout at the bottom)
A "what's the truck telling me right now" panel, grouped by where each reading comes from. It fills in on its own as sources come online, and only lists things that are actually producing a value at this moment:
- OBD-II — readings from a plugged-in OBD adapter: fuel, coolant, intake air, outside temp, battery voltage, engine load, throttle, and more.
- CANbus — readings straight off the head unit's connection to the truck, such as speed, RPM, and your turn signal ("ready" or "blinking").
- Device & GPS — everything that needs no vehicle hookup at all: GPS heading, compass, GPS speed, altitude, location, the pitch/roll tilt sensor, Wi-Fi signal, device battery, and your trip figures (average MPG, range, trip distance).
Each item appears as a small chip with its name and current value. Empty sources simply read "No live signals" until that hardware is connected.
How to switch your whole layout with one tap
- Open Settings › Dashboard.
- Tap OnRoad, XRoad, XTow or XSport at the top.
- All ten cards rearrange immediately, and the button you picked highlights. Read the line under the buttons to confirm what that preset focuses on.
How to change what a single card shows
- In the Dashboard cards grid, tap the card you want to change (a short tap, not a hold).
- A full chooser page opens for that card, titled with its number (e.g. "Card 4"). Every possible reading is listed, grouped under headings by source — OBD-II, GPS, Vehicle Sensors, Device, Trip, and Body Bus — with its live value shown on the right of each row.
- Readings that are producing a value right now appear in bright text. Ones that aren't currently live are dimmed and labeled "no live value now," but you can still pick them — they'll come alive on the card as soon as that source is connected.
- Tap the reading you want. A checkmark marks your choice, it saves instantly, and you're returned to the grid.
- Changed your mind mid-pick? Tap Cancel in the top-right to back out without changing anything.
How to reorder your cards
- In the Dashboard cards grid, press and hold any card for a moment.
- The card lifts and grows slightly to show it's picked up. Keep your finger down and drag it toward another slot — the other cards slide out of the way in real time to make room.
- Release when it's where you want it. The new order saves on the spot and matches your home screen exactly.
How to reset to the factory layout
- Look to the right of the Dashboard cards heading for the Reset to defaults button. (If your cards already match the factory layout, this button is hidden — there's nothing to undo.)
- Tap it once. It turns red and reads "Tap to confirm."
- Tap it a second time to restore the original ten cards. If you wait a few seconds without confirming, it quietly cancels itself so a stray tap can never wipe your layout.
What you need
The dashboard editor works right away — you can rearrange cards and switch drive modes with nothing plugged in.
What fills the cards and the Available signals panel with live numbers depends on what's connected:
- OBD-II readings (fuel, coolant, voltage, engine load, throttle, intake air, outside temp) appear once a supported OBD-II adapter is plugged in and paired in the head unit's Bluetooth settings.
- CANbus readings (speed, RPM, turn signal) come from the head unit's connection to the truck.
- GPS, tilt, Wi-Fi, device battery, and trip figures need no vehicle hardware and populate on their own.
Any reading that isn't live yet still shows in the chooser (dimmed, marked "no live value now") and on its card as a placeholder dash (—) until its source comes online — so you can set up your ideal layout ahead of time and watch it light up as you connect things.
Tips & good to know
- Your tweaks always win. Picking a drive mode reshuffles everything, but a drive mode is not silently re-applied when you restart — your saved cards are what you'll see, so a manual change you made after choosing a mode never gets clobbered.
- The same reading can appear on more than one card if you want it in two places — the editor doesn't stop you.
- Everything saves the instant you do it — choosing a reading, dropping a card into a new spot, or confirming a reset. There's no separate Save button to remember.
- The picker is honest about what's real. Instrument-cluster readings that this truck's trim has never actually broadcast (things like individual tire pressures or gear from the factory cluster) are hidden from the chooser so you can't pin a permanently-empty tile. If your truck ever does start sending them, they'll appear automatically.
- The Available signals panel is a great connection check — glance at it to confirm your OBD adapter or head-unit link is truly online before a trip, since it only lists sources that are producing a value at that moment.