Part 2 · Driving & Navigation
Trail Setup & rig capability
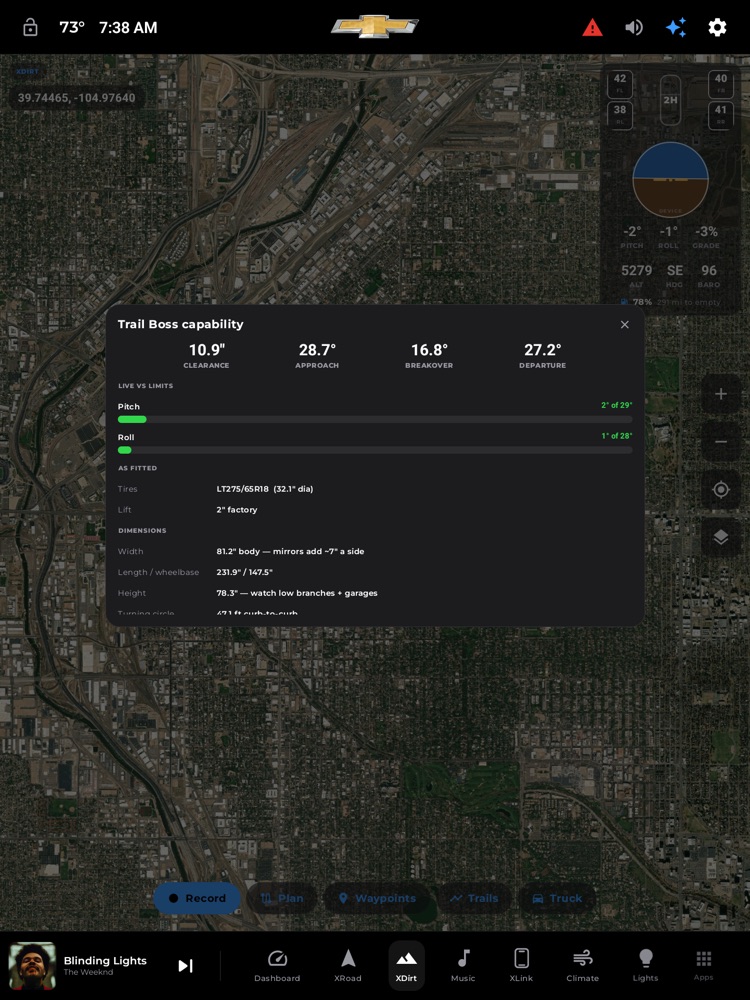
Trail Boss capability — clearance and approach/breakover/departure angles, live-vs-limits, tires, lift, and dimensions.
Trail Setup is your co-driver for the moment you leave pavement. It answers the two questions every overlander asks at the trailhead — "What should I air down to?" and "2-High, 4-High, or 4-Low?" — with numbers matched to the exact terrain ahead and to your truck. Pair it with your live tire pressures and it turns into an air-down helper that counts each corner down to target, then tells you when all four are set. There's also a full capability panel that lays out your rig's real geometry and watches your tilt against its limits as you climb.
Where to find it: Bottom dock › XDirt tab. Trail Setup pops up on its own when you start heading out (see below), or you can open it any time: tap the four-tire cluster in the top-right cockpit, or tap the small SETUP chip when it appears at the top of the map. The separate capability panel opens from the bottom bar's Truck button.
When you'll use it: At the trailhead before you air down, whenever the surface changes mid-trail (pavement to gravel to rock), while you're actually bleeding tires and want to hit the number exactly, and any time you want to sanity-check whether your rig belongs on the track in front of you.
The screen, part by part
The Trail Setup card
- Terrain chips (top row). A scrolling row of six surface types: Graded dirt, Gravel / washboard, Rock / technical, Sand, Mud, and Deep snow. The active one is highlighted in blue. XDirt auto-picks the chip that matches the trail you're on or the one you're guiding to — but you can tap any chip to switch, and every number on the card updates instantly.
- The big pressure number. The headline in large blue text is your recommended cold pressure as a range (for example, 26–30 psi for graded dirt, down to 16–20 psi for rock). This is the number you set your deflators or compressor to.
- Drivetrain + speed. Next to the pressure: the recommended drive setting for that surface (like "4LO · hill descent on drops" for rock, or "4HI + momentum · traction control off" for sand) and a sensible speed cap (crawl, ≤ 35 mph, and so on). These are guidance for you to set on the truck's own controls — xOverland reads your terrain and advises; it doesn't shift your transfer case for you.
- The terrain note. A plain-English sentence of real trail wisdom for that surface — why the number is what it is, and what to watch (heat on long washboard runs, rolling a bead on sand, staying higher on packed snow so the tread bites, and so on).
- Air-down helper (appears when live tire pressures are available). A row of your four corners — FL, FR, RL, RR — each showing its current pressure in the color of how close it is to target, with a cue underneath:
- SET — this corner is in the target band. You're done here.
- ▼ N — still N psi too high; keep bleeding.
- ▲ N — you've gone below the floor by N psi; add a little back.
- — — no live reading for that corner yet.
- All-set banner. When all four corners land in the band, a green checkmark bar appears: "All four set for rock — 16–20 psi. Have fun." If you're all still at street pressure, you'll instead see a nudge telling you roughly how much to bleed.
- Reinflation reminder. At the bottom, a standing reminder to air back up to the door-placard pressure (about 41 psi cold on the stock Trail Boss fitment) before you get back on pavement — low pressure at road speed is what builds the heat that kills sidewalls.
The on-trail SETUP nudge chip
When you're driving on a detected dirt or 4x4 route and aren't actively navigating, a slim oval chip slides in at the top-center of the map — for example "Gravel / washboard — 22–26 psi · SETUP". Tap it to open the full Trail Setup card, or tap the small × to dismiss it for that surface.
The Trail Boss capability panel (Truck button)
- Geometry headline. Four big figures that decide obstacles: Clearance, Approach, Breakover, and Departure angles. Clearance turns green when your fitted tires raise it above stock.
- Live vs limits. Two bars — Pitch and Roll — that fill and change color (green → amber → red) as the truck's live attitude climbs toward its limit. This is the part a phone app can't do: it's reading your actual chassis angle on the trail.
- As fitted. Your tire size (with computed diameter) and lift — factory lift plus anything you've added.
- Dimensions. Width (with a reminder mirrors add ~7" a side), length/wheelbase, height (watch low branches and garages), and turning circle.
- Drivetrain & recovery. Transfer case, rear differential, skid plates, shocks, tow/payload, and fuel — the stock hardware rundown for a 2022 Silverado 1500 Trail Boss.
Per-trail verdict (tap any trail on the map)
With the 4x4 Trails overlay on, tapping a trail opens a card that includes a YOUR TRUCK verdict computed for your actual rig: GO, GO · WATCH WIDTH, CAUTION, NOT ADVISED, or TOO NARROW — each with a one-line reason (breakover angle on ruts, body width on tight tree lines, tire size on modified-rig terrain). It also shows a one-line Setup: suggestion — the air-down pressure and drivetrain for that trail's surface.
How to air down for the trail ahead
- Open XDirt and make sure your live tire pressures are coming through (see What you need).
- Open Trail Setup — tap the four-tire cockpit cluster, tap the SETUP chip, or just start a Record or guidance and it raises itself.
- Confirm the terrain chip matches what you're on; tap a different chip if not.
- Read the big blue recommended cold range — that's your target.
- Start bleeding tires. Watch each corner's cue: keep going while it reads ▼, stop when it says SET, add a touch back if it flips to ▲.
- When the green "All four set" banner appears, you're dialed in. Set the recommended drivetrain (4H/4L) on the truck and go.
How to check whether your rig should run a trail
- Turn on the 4x4 Trails overlay from Map layers (bottom-right Layers button).
- Tap the trail you're eyeing on the map.
- Read the YOUR TRUCK line — GO / CAUTION / NOT ADVISED — and the reason. The Setup: line tells you how to configure for it.
- For the full picture of your truck's limits, tap Truck in the bottom bar to open the capability panel.
How to reinflate correctly
- Before you return to pavement, air every tire back up to the door-placard cold pressure (about 41 psi on the stock fitment — check your door jamb).
- Keep to crawl speeds any time you're below 20 psi. The reminder stays at the bottom of the Trail Setup card as your prompt.
What you need
- Your tire size and lift, entered once. Trail Setup's recommendations are generic by surface, but the per-trail go/no-go verdict and the capability panel's clearance math need your rig's specs. Go to Settings › Vehicle and fill in Tires (e.g.
LT275/65R18or35x12.50R18) and Added lift (in) — that's inches beyond the Trail Boss's 2" factory lift, so0means stock height. Taller tires raise the computed clearance; lift and bigger tires ease the CAUTION/NOT-ADVISED calls. Out of the box it assumes the stock Trail Boss (LT275/65R18, 0" added). - Live tire pressures for the air-down helper. The four-corner readouts and the SET / bleed cues need real tire-pressure data. On a connected head-unit CAN setup this comes straight from the truck's own factory sensors; a supported OBD-II adapter paired in Settings can also supply them. Without a live source, the card still shows the full recommendations — the recommended pressure, drivetrain, speed, and note — it just won't display the per-corner air-down row until pressures are flowing.
- Live tilt for the capability panel. The Pitch/Roll-vs-limits bars read your chassis attitude sensor. Everything else on that panel — geometry, dimensions, drivetrain, your tires and lift — shows regardless.
- The 4x4 Trails overlay for auto-detection and verdicts. The automatic terrain detection and the SETUP nudge chip work off nearby mapped trails, so turn on the 4x4 Trails overlay in Map layers. Without it, you can still open Trail Setup and pick a terrain by hand.
Tips & good to know
- It raises itself at the right moments. Every time you start recording a trail or start guidance to a waypoint or trail, Trail Setup pops up pre-set to the terrain ahead — so you get the "set up for what's coming" prompt without hunting for it.
- One tire, one color, everywhere. A corner that's in the band shows the same color in the air-down helper as it does on the cockpit tire cluster, so a green tire is a green tire no matter where you're looking.
- The numbers are tuned for this truck, not a Jeep. These pressures and drivetrain calls are sized for a ~5,400 lb Trail Boss on load-range-C DuraTracs without beadlocks — which is why the floors sit a bit higher than generic guidance. On rock, the card deliberately won't send you below about 15 psi.
- Cold pressure matters. The recommended range is a cold pressure. An overnight temperature drop bleeds a few psi on its own, so re-check in the morning — especially in snow.
- Recommendations, not remote control. xOverland advises the drivetrain mode and speed; you still set 4H/4L, traction control, and hill-descent on the truck itself. It's a co-driver, not an autopilot.
- Honest about verdicts. The per-trail GO/CAUTION/NOT-ADVISED call is drawn from the trail's mapped difficulty and width plus your specs — treat it as a smart second opinion, not a guarantee. Always verify current conditions and closures on the ground.