Part 2 · Driving & Navigation
XDirt — Map Layers & Overlays
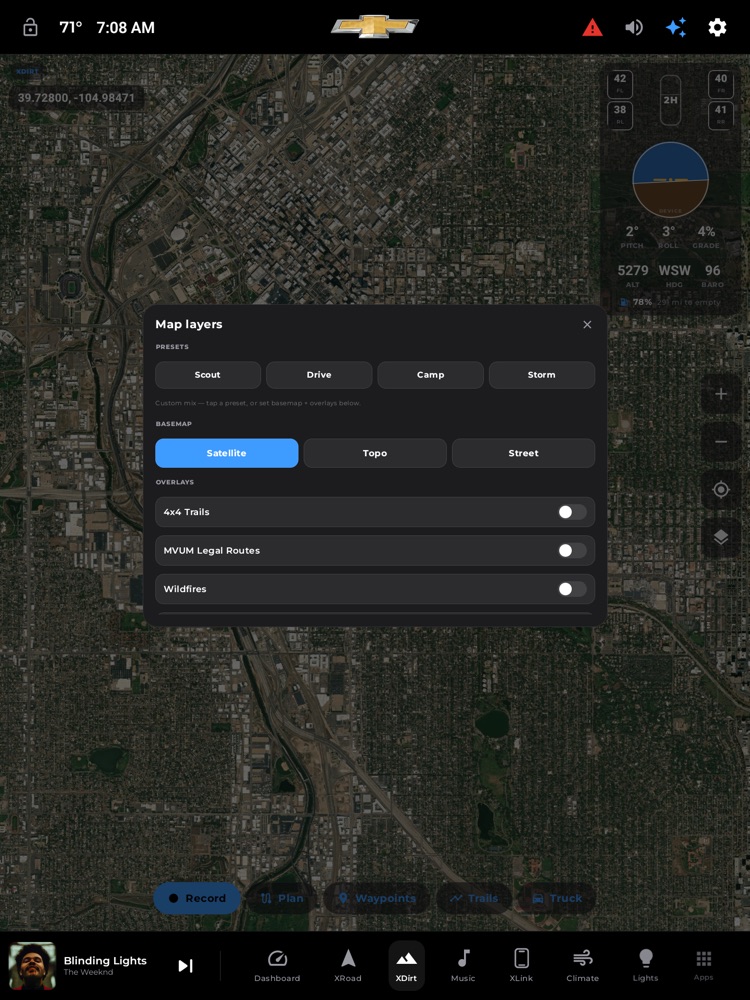
The Map Layers panel: presets (Scout/Drive/Camp/Storm), basemaps, and overlay toggles.
XDirt is your off-road cockpit, and the Layers panel is where you decide what the map actually shows you — satellite imagery or a topo with contour lines, legal forest roads, 4x4 trails colored by difficulty, live weather radar, active wildfires, and more. Everything is drawn from free public data sources (the U.S. Forest Service, USGS, BLM, and others), so there is nothing to subscribe to. And because it is built for use while you are driving a trail, the whole panel is big, tappable, and organized around one-tap "situations" instead of a wall of switches.
Where to find it: Bottom dock › XDirt tab, then tap the Map layers button (the stacked-squares icon) in the control rail down the side of the map.
When you'll use it: Any time you leave pavement — planning a route the night before, switching to satellite once you are on the trail, checking who is legally allowed on a forest road, keeping an eye on an approaching storm cell, or downloading a topo map for a canyon where you know you will lose signal.
The screen, part by part
The Layers panel slides up over the map as a card. Tap anywhere on the dimmed area outside the card to close it. It is organized top to bottom into four sections.
Presets — four big buttons across the top: Scout, Drive, Camp, and Storm. Each one is a complete, ready-made map setup for a moment in your trip. Tapping a preset instantly sets the right basemap and switches on the right combination of overlays, so you pick a situation instead of fiddling with individual layers. The active preset lights up in the accent color, and a short line of text under the buttons explains what it is showing you. If you hand-tweak things afterward, that text switches to "Custom mix" and no preset stays highlighted — which is perfectly fine.
- Scout — plan the route. Uses the Topo basemap and turns on 4x4 Trails, MVUM legal routes, and Land Ownership. This is your planning view.
- Drive — on the trail. Uses Satellite imagery plus the trail lines and terrain shading, so you can see the real ground you are driving over.
- Camp — find a spot. Uses Satellite with Land Ownership and trails, so you can see where you are legally allowed to stop for the night.
- Storm — hazard check. Uses Satellite with live radar and active wildfires — a quick "what is the weather and fire situation right now" glance.
Basemap — three buttons: Satellite, Topo, and Street. This is the base picture under everything else, and only one can be active at a time (the selected one is highlighted).
- Satellite — high-resolution aerial imagery. Best for seeing the actual terrain, water, and vegetation.
- Topo — a classic USGS topographic map with contour lines, elevations, and named forest roads. Best for planning and reading the shape of the land. This is also the map that gets saved for offline use (see below).
- Street — a clean, plain vector road map. Lightest and simplest.
Overlays — a scrollable list of extra layers you can stack on top of the basemap, each a full-width row with the layer name on the left and a large sliding on/off toggle on the right. Tap anywhere on a row to flip it. When a layer is on, a short caption or color key appears just below the list explaining how to read it. The overlays are:
- 4x4 Trails — off-road tracks, doubletrack, and forest tracks drawn from OpenStreetMap. Each trail line is colored by difficulty: green (easy) → yellow → orange → red → purple (extreme). Tap any trail to open an info card with its difficulty, surface, whether it is 4WD-only, and a "your truck" verdict based on your rig.
- MVUM Legal Routes — the Forest Service's official Motor Vehicle Use Map: which forest roads and trails are legally open, and to what kind of vehicle. Lines are color-coded by who is allowed: green = passenger car, yellow = high-clearance, orange = 4WD/OHV, gray = restricted. Tap a route to see its name, exact access class, whether it is seasonal, and the published symbol description.
- Wildfires — the current active-fire perimeters from the national interagency feed (NIFC), drawn as red shaded areas. Tap a fire to see its size in acres, containment percentage, and discovery date.
- Land Ownership — colored public-land boundaries (BLM, Forest Service, and other agencies) so you can tell public land from private. Shown as a semi-transparent shading over the map.
- Hillshade — soft terrain shading (shaded relief) that makes ridges, canyons, and slopes pop into 3D even on a flat topo or satellite view.
- Live Radar — real-time precipitation radar from RainViewer. Light rain shows blue/green, heavier rain builds through yellow to red, extreme cells go magenta, and snow reads white-blue. It refreshes roughly every 10 minutes.
- Nearby Flights — live aircraft flying near you, from a keyless community ADS-B feed. Each plane is drawn pointing in its direction of travel and labeled with its altitude. Tap one to see its callsign, altitude, ground speed, and hex code. (This same overlay is available on the on-road maps too.)
Offline Maps — the bottom section, for saving the map so it keeps working with no signal.
- Download this area — a filled accent button that saves the topo map for whatever you are currently looking at.
- Clear (N) — appears once you have saved areas, showing how many. Tap it to delete all saved offline maps and free up space.
- While a download is running, these buttons are replaced by a progress bar reading "Downloading topo… NN%".
How to switch to a ready-made map setup
- Open XDirt, then tap the Map layers button.
- Tap one of the four preset buttons — Scout, Drive, Camp, or Storm.
- The basemap and overlays update instantly, and the preset lights up. Read the one-line description under the buttons to confirm it is what you want.
- Tap outside the card to close it and get back to the full map.
How to build a custom map view
- In the Layers panel, tap the basemap you want (Satellite, Topo, or Street).
- Tap the toggle on each overlay row you want to turn on. Turn off any you do not need.
- As you add layers, a legend or note appears under the list explaining the colors.
- Your setup is remembered for next time — if it happens to match one of the four presets, that preset will be highlighted the next time you open the panel.
How to identify a trail, route, fire, or aircraft
- Turn on the layer you are interested in (4x4 Trails, MVUM Legal Routes, Wildfires, or Nearby Flights).
- Close the Layers panel.
- Tap the colored line, red fire area, or aircraft icon directly on the map.
- An info card pops up near the bottom of the screen with the details. Tap its X to dismiss it.
How to download a topo map for offline use
- Pan and zoom the XDirt map so the area you want to save fills the screen. What you see is what gets saved, so frame the trailhead, canyon, or camp zone you are headed to.
- Open the Map layers panel and scroll down to Offline Maps.
- Tap Download this area. A progress bar shows the percentage as it saves.
- When it finishes you will see a confirmation. From then on, that area's topo map renders even with no cell signal. Saved areas are named by their location so you can recognize them in the count.
- To free up storage, tap Clear (N) to remove all saved areas.
What you need
Most of what this panel does works with just an internet connection — the map data streams from free public services in the background, and there are no accounts, keys, or subscriptions to set up.
- Live overlays (4x4 Trails, MVUM, Wildfires, Radar, Nearby Flights) need a data connection to load, and they refresh as you move around the map. Coverage is U.S.-focused, since the sources are U.S. federal and community feeds. If a feed can't be reached, XDirt keeps showing you the last data it successfully loaded rather than blanking the overlay — so a momentary dropout never makes a trail or a fire vanish.
- Offline topo is exactly what you use when you have no connection. Download the areas you plan to explore before you head out of coverage, and the topo basemap will keep working. (Live overlays like radar and aircraft still need signal — those are real-time by nature.)
- No OBD adapter, dongle, or extra hardware is required for anything on this panel.
Tips & good to know
- Presets are the fast path. If you are moving, don't hand-toggle six layers — tap Scout, Drive, Camp, or Storm and go. That is exactly what they are for.
- Your layer choice sticks. XDirt remembers your basemap and overlays between drives, so the map opens the way you left it.
- The Map layers button tells you when something is on. Its icon lights up whenever you have any overlay active or a non-satellite basemap selected, so you always know at a glance that the map is showing more than plain imagery.
- Read the color, not just the shape. On the 4x4 Trails layer, color is difficulty; on the MVUM layer, color is who is allowed. Both draw a legend under the toggle list when they are on, so you never have to guess.
- Data is honest. Forest orders and closures can change faster than any published map, and fire perimeters trail the real fire line. The info cards say so, and remind you to verify current conditions with the managing forest. Treat these layers as excellent planning tools, not as a substitute for on-the-ground signs and official closures.
- Downloads save what's on screen. The offline download captures the current view, so zoom to frame your destination before tapping Download. Very large areas may be declined if they would be too big to store — zoom in a little and try again.
- Radar and the topo don't overlap awkwardly. Precipitation is drawn under the trail lines, routes, fire outlines, and waypoint pins, so a passing storm cell never hides the route you are following.