Part 2 · Driving & Navigation
XDirt — off-road cockpit
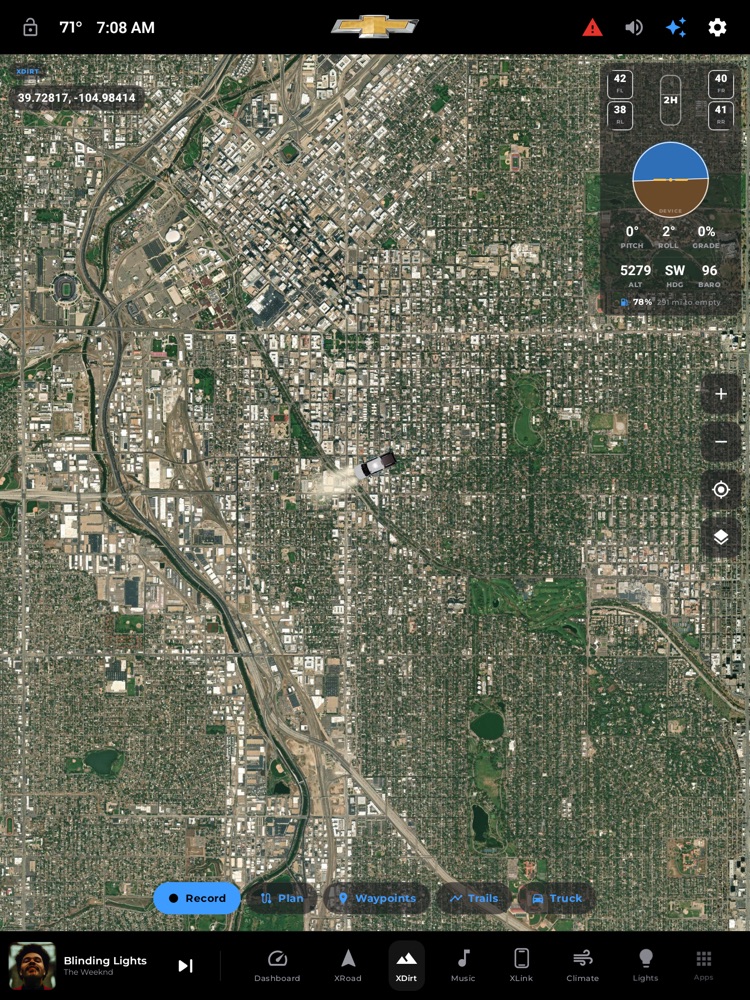
The XDirt off-road cockpit: satellite basemap, tire pressures, inclinometer, and the Record / Plan / Waypoints / Trails bar.
XDirt is your full-screen off-road command center: a big satellite/topo map with a live off-road instrument panel, one-tap trail recording, drop-a-pin waypoints, point-me-there guidance, and a tap-to-build route planner. It's the screen you live on once the pavement ends — glanceable, fat-finger-friendly, and honest about what it does and doesn't know.
Where to find it: Bottom dock › XDirt tab.
When you'll use it: Any time you leave the pavement — scouting a forest road, crawling a rocky trail, finding a campsite, marking a water crossing or a gate, retracing your way back out, or reading out your exact coordinates over the radio to another rig.
This section covers the cockpit and navigation core. Choosing basemaps and overlays (Satellite/Topo/Street, 4x4 trails, radar, fires, and the one-tap presets) and the Trail Setup air-down helper each have their own sections.
The screen, part by part
The map fills the whole screen. Everything else floats on top as glass panels so you always keep the map in view.
Top-left — where you are
- XDIRT badge — a small labeled pill that just tells you which surface you're on.
- REC pill — appears only while you're recording a trail. It shows a red dot, the word REC, and your live distance ticking up as you drive.
- Coordinates readout — a big, bold latitude/longitude pill, sized so it's easy to read out loud to a rescue coordinator or another driver. Tap it to switch between formats: plain decimal (
39.73921, -104.99035) and degrees-minutes-seconds (39°44'21"N 104°59'25"W). - Honesty flags — small colored notes may appear here when a map layer only has partial data or has stopped refreshing (for example "MVUM partial — zoom in for all routes," or a warning that live radar or wildfire data isn't updating). These only show when the matching overlay is turned on.
Top-right — the off-road cockpit (a tall glass panel of live instruments)
- Tire rig — a faint top-down outline of your truck with a live pressure reading at each corner (FL, FR, RL, RR). Numbers turn green when they're at your air-down target, and a corner flips to SLIP in amber if that wheel starts spinning faster than the others at crawl speed. In the middle sits your drivetrain badge (e.g. 4-HI / 4-LO) plus LOCK and HDC (hill-descent) indicators when those are engaged. Tap the tire rig to jump straight to the air-down helper.
- Attitude indicator — an aircraft-style artificial horizon that tilts with your truck, so you can see your pitch and lean at a glance. A small label reads CHASSIS when the tilt is coming from the truck's own sensors, or DEVICE when it's coming from the head unit's built-in sensor. Tap the horizon to re-level it if it ever looks off.
- PITCH / ROLL / GRADE — the numbers behind the horizon. Pitch and roll turn amber as they get steep, and roll turns red at a high-lean caution. Grade is shown as a percent.
- ALT / HDG / BARO — your altitude (elevation, in feet), your heading as a compass direction (N, NE, E…), and barometric reading. These are your compass-and-elevation glance; any value shows a dash when its source isn't available.
- Fuel range — if the truck is reporting it, a fuel gauge line shows your percentage and estimated miles to empty ("how far back out").
Right edge — the control rail (big round glass buttons)
- + / − — zoom the map in and out.
- Center on truck (crosshair icon) — snap the map back to your position and resume following you.
- Layers (stacked-squares icon) — opens the map layers panel (basemaps, overlays, offline downloads). It glows when you've turned something on.
Top-center — guidance & nudges
- Guidance card — appears whenever you're navigating to something. It shows a big bearing arrow that points the way relative to the direction you're facing (green when you're on course), the remaining distance, and an ETA. Tap the ✕ to stop guidance.
- Trail Setup nudge — a slim chip may appear when you're driving on a dirt or 4x4 route, suggesting a tire-pressure setup. Tap it to open the helper, or tap its ✕ to dismiss it. (Covered fully in the Trail Setup section.)
Bottom — the action bar (big pill buttons; the set changes with what you're doing)
- Default: Record, Plan, Waypoints, Trails, Truck — and Backtrack appears once a trail is loaded on the map.
- While recording: Stop, and Backtrack (once you have a couple of points down).
- While planning a route: Undo, Follow, Save, Done.
On the map itself
- Waypoint pins — teardrop pins colored by category, each with its name. Tap one to open its detail card.
- Your recorded/loaded track — drawn as a red line.
- A planned route — a dashed blue line with dots at each point you tapped.
- Active guidance — a bright dashed green course line to your target.
How to record a trail
- In the default bottom bar, tap Record. The map starts following you and the red REC pill appears top-left with your live distance.
- Drive. A red breadcrumb line paints your path, and the distance counts up (new points are only added every few meters, so a stop doesn't pad the number).
- Tap Stop when you're done.
- If you recorded enough of a track, a Save trail box pops up showing the distance and point count, with the name pre-filled to today's date and time.
- Edit the name if you like, then tap Save — or Discard to throw it away. Saved trails live in the Trails panel and survive restarts.
How to drop and use a waypoint
- Long-press anywhere on the map. A Drop waypoint sheet opens showing that spot's coordinates.
- Pick a category — Camp, Fuel, Water, Obstacle, Scenic, Danger, Gate, Trailhead, Parking, or Marker. Each has its own pin color. The pin drops immediately.
- To manage your pins, tap Waypoints in the bottom bar. Each entry shows its name and category, and lets you:
- Tap the row to jump the map to that pin.
- Go — start point-me-there guidance to it.
- Delete (trash icon) — remove it.
- To pull up a single pin fast, just tap it on the map. Its card gives you Go To and Delete, plus how far away it is right now.
How to navigate (Go-To, Backtrack, Follow)
- Go-To a waypoint: open Waypoints and tap Go, or tap a pin on the map and tap Go To. A green course line and the guidance card appear, pointing you straight at it with live distance and ETA. You'll hear "Arrived" when you get there.
- Backtrack (retrace your way out): while recording, tap Backtrack to reverse your breadcrumb and be guided back the way you came. If a trail is loaded on the map, the default bar also shows a Backtrack button that reverses that track.
- Follow an existing trail: open Trails, find the trail, and tap Follow — the app guides you forward along its whole path. (You can also Load a trail to just display it without guidance.)
Any guidance ends when you tap the ✕ on the guidance card, or automatically on arrival.
How to plan a route by tapping (route builder)
- Tap Plan in the bottom bar. The bar switches to route-builder buttons.
- Tap the map to drop points in order — a dashed blue line connects them.
- Use Undo to remove the last point if you misplaced it.
- When you have at least two points:
- Follow — start guidance along the route you just drew.
- Save — store it as a trail (named with today's date) so you can follow it later.
- Tap Done to leave the planner and clear the drawing.
How to see a trail's elevation profile
- Tap Trails in the bottom bar.
- Tap the elevation icon (the small graph) on any saved trail.
- An Elevation card opens with total gain, loss, min, and max, plus a filled line graph of the climb and descent. (This one needs a data connection — see below.)
How to import or export trails and waypoints
- Import a GPX (from Gaia, onX, Garmin, CalTopo, etc.): open Trails and tap Import GPX, then pick the file. Its track is saved as a trail and its waypoints are dropped on the map, then the map fits to show the whole thing. Re-importing the same file won't create duplicates.
- Export a trail: in Trails, tap the share icon on a trail to write it as a standard
.gpxinto the app's files (grab it later over USB or a file manager). - Export all waypoints: in the Waypoints panel, tap the share icon in the header to write every pin to a single GPX file.
What you need
Most of XDirt works from GPS alone, but a few features are richer with hardware or a connection:
- A GPS fix powers your position, the coordinates readout, recording, guidance, and elevation. Until the truck has a fix, the coordinates pill and some readouts stay hidden or show dashes.
- Live tire pressures, drivetrain, lockers, and chassis tilt in the cockpit come from the truck's data connection (the head-unit CAN link, plus a supported OBD-II adapter for TPMS). Without them, those instruments show dashes or fall back to the head unit's own tilt sensor (labeled DEVICE), and the tire chips read "—". The map, recording, waypoints, and guidance still work fully.
- The elevation profile needs an internet connection to fetch terrain heights. Offline (or with too few points), the card simply says elevation is unavailable — nothing breaks.
- Guidance and recording work with no signal. For map imagery in the backcountry, download offline topo ahead of time from the Layers panel (covered in the Layers section).
- Fuel range shows only when the truck reports fuel level or distance-to-empty.
Tips & good to know
- The map follows you by default. After panning around, tap Center on truck to snap back and resume following. Starting a recording, guidance, or loading/importing a trail also re-centers on you.
- Tap the coordinates pill any time to flip between decimal and DMS — handy depending on who you're reading the numbers to.
- Rollover caution: if the truck leans past a safe threshold, the screen edge flashes red and you'll hear a spoken "high roll angle" warning, once per event. The ROLL number turns red to match.
- The heading and horizon are your compass. XDirt reads out your direction of travel as a compass point (HDG) and shows your tilt on the artificial horizon, rather than a spinning compass rose — it's the glance that matters when you're picking a line.
- Distances read in feet up close and miles farther out, so short hops don't turn into awkward decimals.
- Your setup sticks. Saved trails and dropped waypoints persist across tab switches and restarts, and your chosen map layers come back the way you left them. If a stored file ever gets corrupted, the app keeps a backup rather than losing your trails.
- Honest instruments: every gauge that can't reach its source shows a dash instead of a fake number, and layers that stop updating say so — XDirt would rather tell you it doesn't know than quietly show you stale data on the trail.